These steps must be taken EVERY TIME you do a bomb calorimetry run:
Seal the bomb in the apparatus
When you use powdered samples in a bomb calorimeter you must form them into tightly-packed pellets so that the entire sample will combust. Weigh out an appropriate amount of each sample and press it into a pellet using the pellet press. The picture below shows how to fill the pellet press mold with the powdered sample:
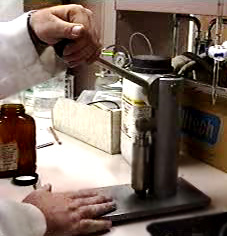
After filling the pellet press mold with the powdered sample, position the mold in the press and put pressure on the powder by firmly pressing the handle down in a smooth stroke:
Place the bomb head on its stand. Using emery paper or steel wool, polish the two electrode terminals and the bomb head.
Solid Samples:
Weigh the pellet to +/- 0.1 mg. Cut a piece of IRON ignition wire 8 - 10 cm in length from the spool. Weigh the wire to +/- 0.1 mg. Attach the wire:
- Hold the wire across the terminals of a 6 Volt battery so that the center of the wire is between the terminals. Hold the wire with forceps. Have your lab partner pick up the pellet with forceps and set it on the wire. The wire will heat when it is held across the terminals and will fuse into the pellet. Remove the wire from the battery terminals as soon as the wire has fused into the pellet. Reweigh the wire and pellet to +/- 0.1 mg. Wrap the two ends of the ignition wire around the two electrodes such that the pellet is suspended over the combustion cup. Do this such that the wire does not touch the edges of the combustion cup.
- ALTERNATELY, you can simply put the solid pellet in the ignition cup
and wrap the wire around the ends of the electrode terminals. Bend the
wire so that it is in good contact with the pellet but does not touch
the ignition cup anywhere.
Below is a picture of how this alternate setup should look.
Liquid Samples:
Weigh the ignition cup to +/- 0.1 mg with and without your liquid sample. Record these masses and determine the net mass of the liquid sample. Cut a piece of IRON ignition wire 8 - 10 cm in length from the spool. Weigh the wire to +/- 0.1 mg. Put the cup and liquid sample in place between the electrodes. Wrap the two ends of the ignition wire around the two electrodes, and loop the wire into the liquid sample. Do this such that the wire touches the liquid but not the edges of the combustion cup.
Sealing of the bomb apparatus:
Taking care to maintain the setup of the bomb head intact (you want to keep the wire connected to the electrodes and in contact with the sample), gently place it in the body of the bomb and screw the head into place. Check for electrical continuity by connecting an ohmmeter across the external terminals on the bomb. If the resistance is low, there is good connection between the fuse wire and the terminals. If the resistance is infinite, the wire is not making good contact with the electrodes and the bomb must be opened and the wiring checked before continuing.
- Close the outlet valve on the bomb's top. Do not over tighten. With the valves on the oxygen tank closed, attach the inlet tube from the tank to the bomb.
- Slowly let 20 atm of oxygen into the bomb by opening the valve on the oxygen tank. Then close the tank valve.
- Bleed the gas out of the bomb by slowly opening the outlet valve on the bomb head until you no longer hear a hissing sound. Repeat this fill-and empty cycle two more times at least.
- Slowly let 25 atm of oxygen into the bomb. Do not go over 30 atm, or you will have to dismantle the bomb and start over. This is your final fill. DO NOT empty the gas from the bomb this time.
If you have to start over, you will need to bleed the pressure in the tank so the top may be removed.
Below is a picture of how to connect the bomb to the O2 gas tank.
Put everything together and seal the unit:
- Place the bucket into the insulating jacket and be sure that it sits flat.
- Measure 2 L of water with a volumetric flask and place it into holding bucket. Make sure that the temperature of this water is near the lower end of the temperature range visible on the thermometer that is inserted into the calorimeter.
- Attach the lead wires to the bomb while holding the bomb above the water.
- Gently lower the bomb into the bucket and be sure that it sits flat.
- Put the lid into place and clamp the lid down until snug. DO NOT overtighten the c-clamps or you will CRACK the cover.
- Lower the thermometer into the calorimeter. These thermometers are very fragile and very expensive. BE CAREFUL!!!!!!
- Attach the rubber belt to the stirring motor.
Below is a picture of how the apparatus is assembled.
Now you are ready to fire the charge and start taking time and temperature readings. Before you fire the charge, make sure the timer is on zero and that you can see the thermometer easily to take readings every 15 seconds.
Take and record temperature readings every 15 seconds for about three minutes PRIOR to firing the charge. Do not be surprised if there is a drift in these readings. Once the readings are fairly stable, you can proceed to fire the charge.
To fire the charge :
- One person should push both the ignition button and the timer button AT THE SAME TIME.
- Hold the ignition button down for 2 to 5 seconds. Do Not hold it down more than 5 seconds. Keep your eye on the light as you push the button. It should turn on briefly.
- The temperature will probably need about 20 seconds after ignition to begin rising.
- You should see a steady increase in temperature for the first few minutes and then it should slowly reach equilibrium. This is a good time to get everyone in the group involved, by assigning tasks: one person reads time, one reads temperature, one records (preferrably not the temperature reader.)
- Continue to take readings for two to three minutes after you have three consecutive temperature readings within +/- 0.05 °C. Again you may observe some drift.
When the run is complete, turn off the stirring motor, lift and move the cover. Lift the metal bucket out of the calorimeter, and remove the bomb from the bucket. Carefully dry the bomb, and gently open the gas outlet valve to relieve the inside pressure. Once the pressure has decreased (no more hissing), remove the top of the bomb.
Check the inside walls of the bomb for beads of water or soot. These are signs of complete combustion. If there is any unburned wire sitting inside the combustion cup or on the two electrodes, remove it with tweezers and weigh it. Determine the amount of unburned iron wire. The unburned wire will decrease the actual amount of heat of combustion by 5858 J/g not burned. Be sure not to mistake round balls of iron oxides for the unburned wire. Remove these from the bomb and sample holder.
Perform two good calibration runs and calculate the heat of combustion for the benzoic acid pellets using the same amount of water for every run.